Table of Contents
1######                        #     #    #     #
2#     # #  ####   ####        #     #    ##   ## # #    # ###### #####
3#     # # #      #    #       #     #    # # # # #  #  #  #      #    #
4######  #  ####  #      ##### #     #    #  #  # #   ##   #####  #    #
5#   #   #      # #             #   #     #     # #   ##   #      #####
6#    #  # #    # #    #         # #      #     # #  #  #  #      #   #
7#     # #  ####   ####           #       #     # # #    # ###### #    #
2025-10-05: Rescuing the system #
So, if you read my previous Post then you would recollect a repository on
github which contained a
release which appeared to contain the same set
of files as found in /root/pine-*/out. Well, in that release, there was what appeared to be a debian package
containing a linux kernel which was a higher release (105SF) than the one currently installed. It was titled
linux-image-6.6.20-starfive_6.6.20-starfive-105SF_riscv64.deb, which would lead one to believe it was compatible with
all the other packages which resided on the system, since it came from the same source (basically), was the same
architecture, and the same kernel version.
Unfortunately, if you assumed that, you would be horrifically wrong, as I was. Installing the aforementioned kernel package will result your device booting into read only file system mode. Virtually blocking your ability to make any changes to the system, and thus effectively making your system useless. Which is where we started from on day 4.
Recovering your device #
[!NOTE] Below is gibberish
There is very little reason to actually do this, but if you are unaware, there is a site called Linux From Scratch, which basically instructs you on how to build your own linux operating system "from scratch", starting with the kernel. Gentoo’s installation process at one time was very similar to this, although that might have changed by now. Regardless, the reason for mentioning both of these processes is to bring about some familiarity with the process we will need to perform to rescue our system.
In a nut shell, we will need to acquire a prebuilt image of a working operating system, and flash that image onto a
microsd card. For future reference, this flashed image will be referred to as our rescue image. Then we will insert the
microsd card into our tablet, and the tablet will automatically boot into it without further input. From there we can
mount the partition(s) which contain our damaged operating system. Doing this will allow us to mount the filesystems as
read/write, rather than read only, as they are now. Then we will need to either start up the old kernel image by
mounting it as a loop device, or we will need to copy a working kernel file into the old system file system, and then
start it up through mounting on a loop device. Once complete, we will execute the chroot command to change the
reference of the running instance of our filesystem over to the former file system. From there we can make any changes
we need to in order to get the system working, and simply reboot when complete.
Preparing for the recovery #
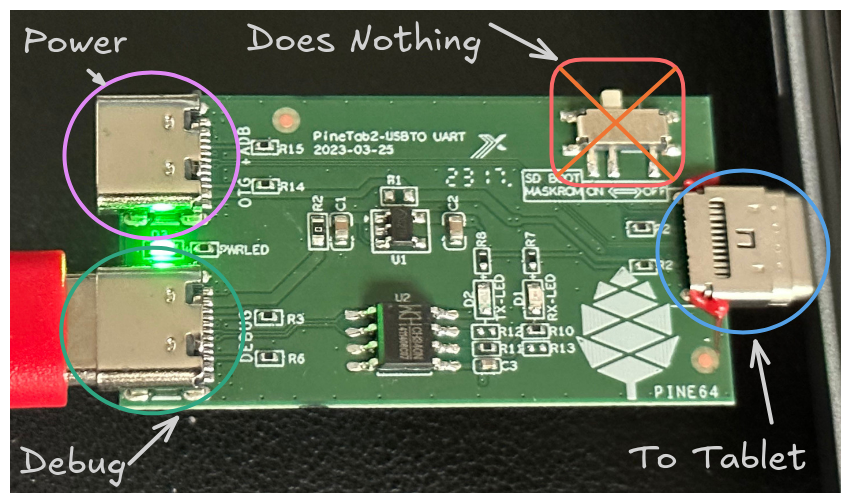
Unless you want your tablet to run out of power mid rescue, it is a good idea to plugin both USB ports from the UART adapter into your host system. One of those USB ports provides serial terminal access to the host, and the other provides power to charge the device. Below is a diagram to explain this.
Acquiring an image to use for recovery #
As mentioned previously, the image used to recover our system will be referred to as a rescue image. In order to maximize the compatibility of the rescue image to the hardware in our system and avoid any further mistakes in compatibility we need to use an image officially supported by the manufacturer of the device. This is easier said than done as Pine64’s documentation wiki is a little out of date, so you will need to find the official documentation. (This was discovered only after registering an account with the wiki.)
Now that we have up to date documentation, it explains the system images mentioned in the Pine64 wiki page for the PineTab-V were a part of "Batch 1" released in 2023, and the images found in starfive’s github repo are a part of "Batch 2" released this year in 2025. Furthermore, the official docs mention referring to the official release notes for instructions on how to flash this image, which we will do.
Creating the rescue image #
What the documentation doesn’t say is that you will need to have a microsd card approximately 32GB in size at a minimum,
and you will need to write the provided
image
to the microsd before preceeding with the instructions provided in the release notes. So insert your microsd card
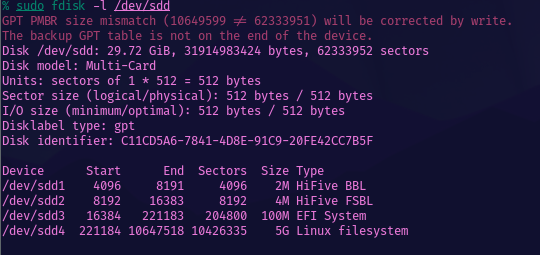
however you can into your computer, and note which drive the system recognizes it as. For the lazy, this can be done by
reading the output of dmesg with sudo dmesg | tail, or for the aspiring this can be done with sudo fdisk -l. The key
to distinguishing your microsd card from the other drives is by it’s size. On my system, this is /dev/sdd. Then simply
extract the image from the "bz2" archive with bunzip2 and write the image to the drive with dd.
1bunzip2 pinetabv-image-debian-pinetabv-1.3.0.img.bz2 && dd if=pinetabv-image-debian-pinetabv-1.3.0.img of=/dev/sdd bs=4k
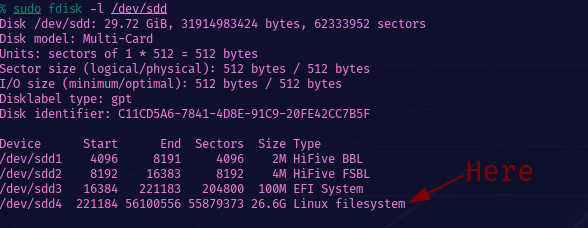
Go ahead and extend partition 4 #
You can do this after copying files, but let’s go ahead, play it safe, and do it before we copy anything important over. As you will notice, before we do anything the filesystem of partition "#4" is only 5g.
Now execute the following commands replacing /dev/sdd with whatever your drive happens to be.
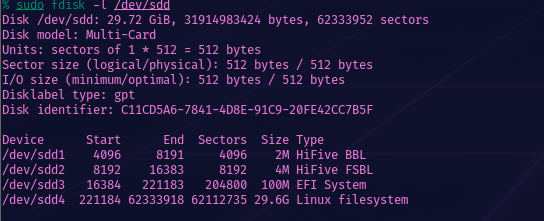
1sudo growpart /dev/sdd 4  # extend partition 4
2sudo e2fsck -f /dev/sdd4  # Check for errors
3sudo resize2fs /dev/sdd4  # extend filesystem
4sudo fsck.ext4 /dev/sdd4  # Check for Errors
Now you will notice the filesystem is 29.6G.
Performing the recovery #
First you will need to mount the fourth partition in the rescue disk you just created.
1# If it doesn't exist, create a dir to mount the sdcard at.
2sudo mkdir -p /media/sdcard
3# Then mount partition '#4' there.
4sudo mount /dev/sdd4 /media/sdcard
Then you will want to download and copy the following files inside of that partition.
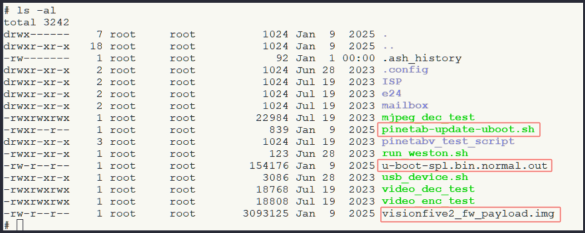
- visionfive2 Firmware Image
- u-boot binary image
- The pinetab update u-boot script is completely missing from the repository. :(
Since the update script for u-boot could not be found in StarFive’s repo, and alternative update
script was chosen. There was also a tool called spl_tool, which is clearly not
the same thing. Also, This
Script
contains some informative tidbits into how StarFive planned for system maintenance to be performed.