1#  ____  ___ ____   ____   __     __  __  __ _____  _______ ____
2# |  _ \|_ _/ ___| / ___|  \ \   / / |  \/  |_ _\ \/ / ____|  _ \
3# | |_) || |\___ \| |   ____\ \ / /  | |\/| || | \  /|  _| | |_) |
4# |  _ < | | ___) | |__|_____\ V /   | |  | || | /  \| |___|  _ <
5# |_| \_\___|____/ \____|     \_/    |_|  |_|___/_/\_\_____|_| \_\
Working with Apt, Rescue Risc-V boot partitions, and salvaging syslinux #
Working with Apt #
After repetitively running into errors attempting to upgrade the distrobution release of the StarFive's pinned version of Debian, we gave up, and settled on performing an upgrade to bookworm per StarFive's debian repository releases page. Which we probably should write up a blog entry on when there is time.
[!note] The speed of your graphics will considerably decrease if you update to bookworm.
Today's entry in the chronicles of Risc-V is all about placing holds on packages, and handling package dependency conflicts. If we have a chance, we might talk about current thoughts on creating a workable desktop environment.
Putting a hold on packages #
The command apt-mark manages several package tags for apt, primarily package holds and installation state.
By installation state, we mean whether a package is marked to have been installed manually or automatically as
a dependency of another package. What we are interested in is placing a hold on packages installed from
StarFive's repositories that are critical to system functionality.
Below is the list of packages you should place on hold:
linux-image-6.6.20-starfive
vpu-modules-6.6.20
The task of placing a hold on a package is rather elementary, you simply use apt-mark hold $PACKAGE. Then
when it is time to remove the hold you use apt-mark unhold $PACKAGE.
Working with Risc-V Partition Schemes #
As of this moment, Linux systems that are powered by a Risc-V processor have a slightly different booting process than the x86 systems, while this differs in other systems for the Risc-V processor. The one thing these different Operating System implementations share in common is their application of OpenSBI as the bios level booting firmware. Linux then bootstraps the remainder of the boot process by loading the EFIshell to provide critical drivers to the kernel in order to successfully complete the remainder of the boot process. Once this is successfully performed, only then is syslinux used to load the actual kernel loaded and the system kickstarts.
If you ran sudo fdisk -l to acquire a print out of partitions for all devices, you would notice four
partitions total. The first partition is where OpenSBI resides, the second is where EFIshell and required
firmware are stored, the third is where syslinux resides and is mounted to /boot, and the final partition is
for your system.
 1Disk /dev/sdd: 29.72 GiB, 31914983424 bytes, 62333952 sectors
 2Disk model: Multi-Card
 3Units: sectors of 1 * 512 = 512 bytes
 4Sector size (logical/physical): 512 bytes / 512 bytes
 5I/O size (minimum/optimal): 512 bytes / 512 bytes
 6Disklabel type: gpt
 7
 8Device      Start      End  Sectors  Size Type
 9/dev/sdd1    4096     8191     4096    2M HiFive BBL
10/dev/sdd2    8192    16383     8192    4M HiFive FSBL
11/dev/sdd3   16384   221183   204800  100M EFI System
12/dev/sdd4  221184 62333918 62112735 29.6G Linux filesystem
Partition #1 /dev/sdd1 and partition #2 /dev/sdd2 are formatted to type "HiFive BBL" and "HiFive FSBL"
respectively. Both of these partitions use a proprietary partition type specific to HiFive devices, and are boot
labels. They should not be tinkered with or removed, and the most recent release of fdisk, lists them as part of a set
of partition types fdisk will not remove or write to. How to create your own, or even if there is ever a situation where
you would need to create your own is unknown. Best policy is to ignore them and carry on.
If by accident you use an older version of fdisk which does not recognize them or prevents their removal, HiFive does provide disk images to return your device to it’s factory default state in the previously mentioned Github repository. It will require you to completely write over the current disk image, and therefore anything else on that drive. More information can be found out about this process on the gentoo wiki.
Recovery a damaged boot sector device #
As one user put it on the pine64 forum, "These things are bound to happen..." So strap in, because it’s going to be a wild ride for the both of us.
Acquire necessary files #
It is critical to have all the files necessary to complete this operation together in the same folder for easy access. To make things even more easier, shorten the names by renaming them something easier to remember. Uploading from relative paths will not work during the recovery operation.
Download the recovery tool #
The recovery tool for correcting the boot of a starfive device is located in this
repository and will be located in the recovery/ directory. Currently the most
recent version is "jh7110-recovery-20230322.bin". For convenience I have renamed this to "rescue.bin". So, clone this
repository using git.
1git clone https://github.com/starfive-tech/Tools starfive-tools && cd starfive-tools/recovery
Download the recovery images #
Next we will need to return to our favorite repo on github, the starfive debian repository. From there we will got to the most recent release of software for the pinetab-v, and download the u-boot-spl.bin.normal.out file, and the visionfive2_fw_payload.img file.

Plugin the UART Adapter #
First thing you need to do is have your UART adapter plugged into your tab, and both cables connected to the adapter. This way you will have connection to the UART converter, and a steady power source at the same time.
Boot your device into bootloader mode #
With the rockship powered pintab, this is referred to as flashmask mode, or something similar. But, it took an hour or two reading documentation, searching, and playing around until we found it. Put your device into bootloader mode by turning off your device, then press and hold the "Volume Up" button, at the same time press and hold the power button until the device comes on again. You will know you are successful, when the little "RX" led light on your adapter begins to flash rapidly. Another successful indicator is your serial terminal should be printing out "CCCCCCCCCCCCC" over and over again.
Run the recovery #
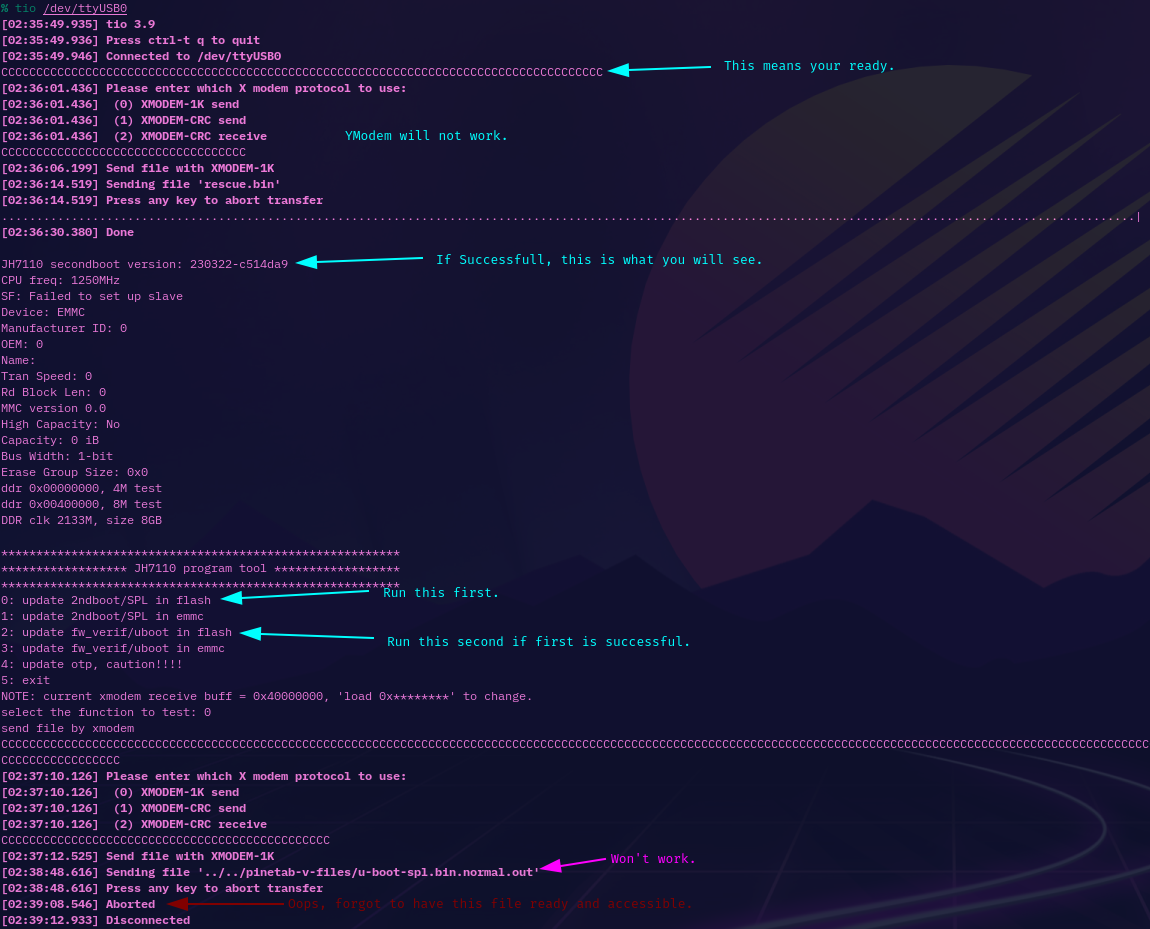
In order to recover your system you will need a serial terminal application that provides the xmodem protocol for sending files. For this we choose tio, because it is a nice mix of both being featureful, and minimal.

- connect to your device
tio /dev/ttyUSB0 - upload the recovery program by pressing "Ctrl-t x" & "1", then enter the path.
- The program will startup automatically.
- Hit "0", then "Ctrl-t x" & "1", then enter path to file.
- Upload your "u-boot-spl.bin.normal.out" file.
- Hit "2", then "Ctrl-t x" & "1", then enter path to file.
- Upload your "visionfive2_fw_payload.img" file. This will take a long time to upload.
- Poweroff

Fixing Syslinux/Extlinux Boot #
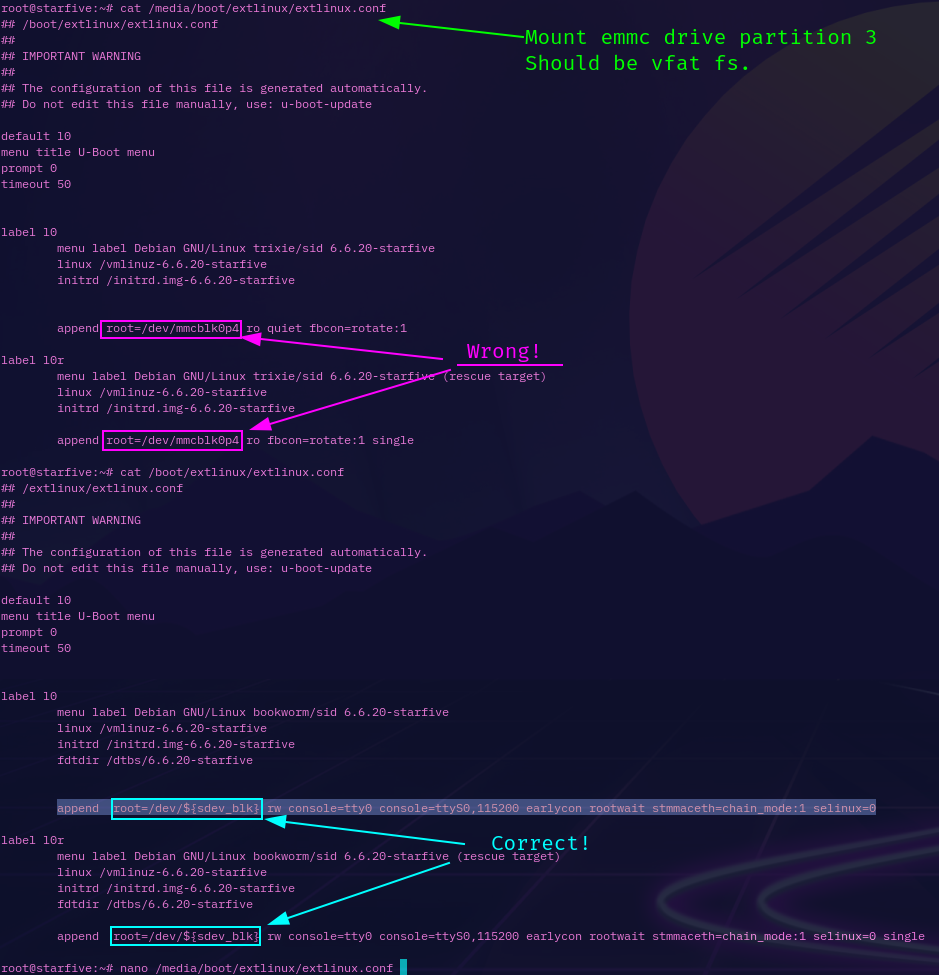
If you run u-boot-update, the result will be a broken boot. The reason for this is the script will read from
/proc/cmdline, and will inform the script that the root partition is /dev/mmcblk0p4, but this is not correct. In
order to boot the system correctly, a variable will need to be provided in place of the actual device. In other words,
/dev/${sdev_blk} is the correct root parition to boot from.
Tampering with the u-boot configuration file /etc/default/u-boot will not correct this configurational conflicting
conundrum, and editing the configuration file for extlinux will not correct it either. You will need to run
u-boot-update with the filesystem of the device in question as root, and then manually modify the configuration file
for extlinux /boot/extlinux/extlinux.conf afterward, by hand. Below is how to do this.
Correctly Configuring Syslinux Boot #
- Boot from the rescue image you have on your sdcard.
- Mount the root filesystem of the EMMC.
mount /dev/mmcblk0p4 /media/emmc - Mount the boot partition of the EMMC as the
/bootfolder for the root filesystem.mount /dev/mmcblk0p3 /media/emmc/boot - Copy
/proc/cmdlineinto the mounted filesystem.cp /proc/cmdline /media/emmc/proc/ - Chroot into the mounted filesystem.
/sbin/chroot /media/emmc - Run
u-boot-update - Open
/boot/extlinux/extlinux.confin an editor.nano /boot/extlinux/extlinux.conf - Locate the lines that begin with
append. - Relace
root=/dev/mmcblk0p4withroot=/deb/${sdev_blk} - Hit
Ctrl-sthenCtrl-xto save and exit the editor. - Power down your device.
/sbin/poweroff - Remove your sdcard.
- Power back on to ensure it worked.
Upgrading to Sid #
Yep, it is possible once proper holds are placed to prevent critical system packages from being overwritten. Simply place the proper holds like defined above, and prioritize your repositories like explained elsewhere. Then follow the steps outlined in the first part of this series, and be sure to complete the process of distribution upgrade before rebooting.